(Adding categories) Tag: categoryselect |
No edit summary Tag: Visual edit |
||
| (5 intermediate revisions by 3 users not shown) | |||
| Line 1: | Line 1: | ||
| ⚫ | |||
| − | ==<nowiki/>== |
||
| ⚫ | |||
| − | == |
+ | ==Hiring and Firing== |
| − | Workers are shared across your [[family]], rather than character-specific. At a larger city's [[Work Supervisor|work supervisor]] you can spend 5 [[energy]] to see a random available worker varying in race and quality. Refreshing the random selection costs 5 energy each time. Once you have found a worker you wish to hire, you spend a sum of silver ranging from 1,500 silver to 90,000 silver to hire the worker for use out of the city your purchased it in. The worker can [[Lodging|lodge]] anywhere in the |
+ | Workers are shared across your [[family]], rather than character-specific. At a larger city's [[Work Supervisor|work supervisor]] you can spend 5 [[energy]] to see a random available worker varying in race and quality. Refreshing the random selection costs 5 energy each time. Once you have found a worker you wish to hire, you spend a sum of silver ranging from 1,500 silver to 90,000 silver to hire the worker for use out of the city your purchased it in. The worker can [[Lodging|lodge]] anywhere in the territory the city is in. As long as there is a node connection you can assign workers to work in other territories - but can not move a worker's lodging to another region. That means his work efficiency will drop if he has to travel far between the place of his lodging and work place. |
Certain NPC's can sell higher tier workers if you have gained enough [[Amity]] with them. |
Certain NPC's can sell higher tier workers if you have gained enough [[Amity]] with them. |
||
| − | The map has on the bottom right a button to open your worker management screen. It lists all workers belonging for the |
+ | The map has on the bottom right a button to open your worker management screen. It lists all workers belonging for the territory selected on the map (so switch between the maps territories to manage workers in different regions!). You can fire workers through that menu if you chose so. |
| + | Note: Once you fire a worker you cannot get them back. So if you happen to fire a worker with a unique skill or high level you will need to find another of similar level.<ref>https://wiki.blackdesertonline.com/index.php?title=Workers#Hiring_and_Firing</ref> |
||
| ⚫ | |||
| − | Workers can be assigned to resource nodes, workshops or banking. |
||
| + | ==Types== |
||
| + | There are four types of workers: [[Goblin]], [[Papu]], [[Human]] and [[Giant]]. |
||
| + | |||
| + | Goblin workers have fast work speed and movement speed, so they finish work in the fastest time. They have the lowest stamina out of the three species of workers so they need to be maintained more often. |
||
| + | |||
| + | Giant workers have the highest stamina so they can work for longer. The Giants movement speed is the lowest and they have the second highest work speed. Giants require less maintenance. |
||
| + | |||
| + | Human workers are the jack of all trades with average work speed, movement speed, and stamina. |
||
| + | |||
| + | Your workers are divided into 5 categories that represent their skill/grade. They're shown with various colors. The higher the quality/tier the better base stats the workers will have. The qualities are: Naive (white), Basic (green), Skilled (blue), Professional (yellow) and Artisan (orange). |
||
| + | |||
| ⚫ | |||
| ⚫ | |||
| ⚫ | |||
| + | |||
| + | ===Production Nodes=== |
||
To assign a worker to gather a resource and bring it back to the regions [[storage]] you need to unlock all connecting nodes between the work location and the worker's city of origin by spending [[Contribution Points|contribution points]]. You must also have spent contribution points on both the final location node and the resource node belonging to it (shown in the images below). |
To assign a worker to gather a resource and bring it back to the regions [[storage]] you need to unlock all connecting nodes between the work location and the worker's city of origin by spending [[Contribution Points|contribution points]]. You must also have spent contribution points on both the final location node and the resource node belonging to it (shown in the images below). |
||
| + | |||
| ⚫ | |||
| ⚫ | |||
[[File:2016-03-05 67139015.PNG|thumb|220x220px|How to assign workers to an already owned production house.]] |
[[File:2016-03-05 67139015.PNG|thumb|220x220px|How to assign workers to an already owned production house.]] |
||
| ⚫ | If you assign workers to a workshop they will take resources from storage, process |
||
| + | ===Crafting=== |
||
| − | The third option of jobs workers can perform is to send them to investment nodes with [[Currency|gold bullions]] in your storage in hopes that they bring back interest. With this method, you will always be guaranteed that your investment will be returned in the least. This option is the longest single action for workers to perform in Black Desert. |
||
| ⚫ | If you assign workers to a workshop they will take resources from storage, process them and put the resulting good back into storage - provided there are empty slots. Worker can craft a wide array of items but which item depends on the type of workshop you assign them to. Once again all nodes between the lodging of a worker and the workshop have to be connected and they will only access the regional storage. So having good A in storage at region X will not be accessible if the worker lives in region Y. |
||
| + | |||
| + | ===Investment Banks=== |
||
| + | The third method is to earn money by sending your workers to investment banks. You don’t need contribution points to unlock Investment Banks, but you will need Gold Bars to invest. You can obtain gold by going to the Storage NPC and converting your silver into gold bars of various silver values. |
||
| + | |||
| + | ===Garden=== |
||
| + | The fourth method is to send workers to manage crops in your garden. Gardens without workers will require periodic care and will have a typically slow growth rate. Assigning workers to a garden will allow them to automatically prune and take care of pests automatically thereby reducing the time it takes to harvest. |
||
| + | |||
| + | ===PvP=== |
||
| + | The fifth way to use your workers is to assign them to build a command post or castle for the Conquest war or Node war. You may need to mobilize a large number of workers belonging to the guild because the command posts and castles will need to be ready for these massive PvP events. |
||
| + | |||
| + | ==Stamina== |
||
| + | |||
| + | Worker consume Stamina from a limited pool they have. When a worker runs out of Stamina, you need to use a certain type of food item to restore their Stamina points.<ref>https://wiki.blackdesertonline.com/index.php?title=Workers#Putting_Your_Workers_to_Work</ref> |
||
| + | |||
| ⚫ | |||
| ⚫ | The worker management is located at the bottom right of the world map, or through the mining pick button located beneath your experience bars. Via the worker management, you can check their job progress, restore their Stamina, send them through an upgrade test, cancel their remaining work order, or fire them. |
||
| + | |||
| + | ==Promotion== |
||
| ⚫ | Upgrade tests are available to a worker once every 10 levels, with the chance to go up in quality by one level. They take 24 hours to complete, and you can only have one worker in a test at a time. Promotion tests continue to progress even while logged out. The results of a promotion test will be sent to your in game mail. |
||
| + | |||
| + | ==Skills== |
||
| + | As your hustle and bustle they will accumulate experience points. Every 5 levels they will acquire a random skill. once worker becomes level 30 they would have acquired 7 skills. The skills granted to workers is random, but there are certain skills that are only available to higher skill level of workers. |
||
| + | |||
| + | When you promote your workers, their skill level will increase, but their experience and skills will be reset. It is still recommended to promote workers as they will have higher base stats. Workers purchased through the amity game will already come with certain preset skills. Make sure you research carefully to get the workers that best benefit your play-style. |
||
| − | === |
+ | ===Skill Reset=== |
| + | Once a worker reached level 30, has 50% xp, is either artisan or has failed all promotions, you can perform a skill reset. This will allow you to build the perfect worker based on your needs. The skills acquired through the skill reset is random but can be done continually as your worker earns XP.<ref>https://wiki.blackdesertonline.com/index.php?title=Workers#Skills</ref> |
||
| − | Worker consume Action Points from a limited pool they have. When a worker runs out of Action Points, you can either use a food item to restore their points, or let them sit idle for a long period of time to recover. Conversely, you can fire the worker and just hire a new one. |
||
| ⚫ | |||
| ⚫ | |||
| ⚫ | You can use a Work Supervisor NPC to buy and sell workers to other players, allowing you to directly profit from a developed worker. Multiple factors affect the price of the worker, such as quality (color), abilities, and level. Using the market, you may discover a worker tailored to a specific task you perform. |
||
| ⚫ | The worker management is located at the bottom right of the world map, or through the mining pick button located beneath your experience bars. Via the worker management, you can check their job progress, restore their |
||
| + | ==References== |
||
| − | === Upgrade Tests === |
||
| + | <references /> |
||
| ⚫ | |||
| ⚫ | |||
| ⚫ | You can use a |
||
| − | [[Category:NPC]] |
||
[[Category:Features]] |
[[Category:Features]] |
||
[[Category:Gathering]] |
[[Category:Gathering]] |
||
Latest revision as of 09:16, 19 September 2018
In Black Desert you can hire workers to help you with a variety of actions.
Hiring and Firing
Workers are shared across your family, rather than character-specific. At a larger city's work supervisor you can spend 5 energy to see a random available worker varying in race and quality. Refreshing the random selection costs 5 energy each time. Once you have found a worker you wish to hire, you spend a sum of silver ranging from 1,500 silver to 90,000 silver to hire the worker for use out of the city your purchased it in. The worker can lodge anywhere in the territory the city is in. As long as there is a node connection you can assign workers to work in other territories - but can not move a worker's lodging to another region. That means his work efficiency will drop if he has to travel far between the place of his lodging and work place.
Certain NPC's can sell higher tier workers if you have gained enough Amity with them.
The map has on the bottom right a button to open your worker management screen. It lists all workers belonging for the territory selected on the map (so switch between the maps territories to manage workers in different regions!). You can fire workers through that menu if you chose so.
Note: Once you fire a worker you cannot get them back. So if you happen to fire a worker with a unique skill or high level you will need to find another of similar level.[1]
Types
There are four types of workers: Goblin, Papu, Human and Giant.
Goblin workers have fast work speed and movement speed, so they finish work in the fastest time. They have the lowest stamina out of the three species of workers so they need to be maintained more often.
Giant workers have the highest stamina so they can work for longer. The Giants movement speed is the lowest and they have the second highest work speed. Giants require less maintenance.
Human workers are the jack of all trades with average work speed, movement speed, and stamina.
Your workers are divided into 5 categories that represent their skill/grade. They're shown with various colors. The higher the quality/tier the better base stats the workers will have. The qualities are: Naive (white), Basic (green), Skilled (blue), Professional (yellow) and Artisan (orange).
Assigning Jobs
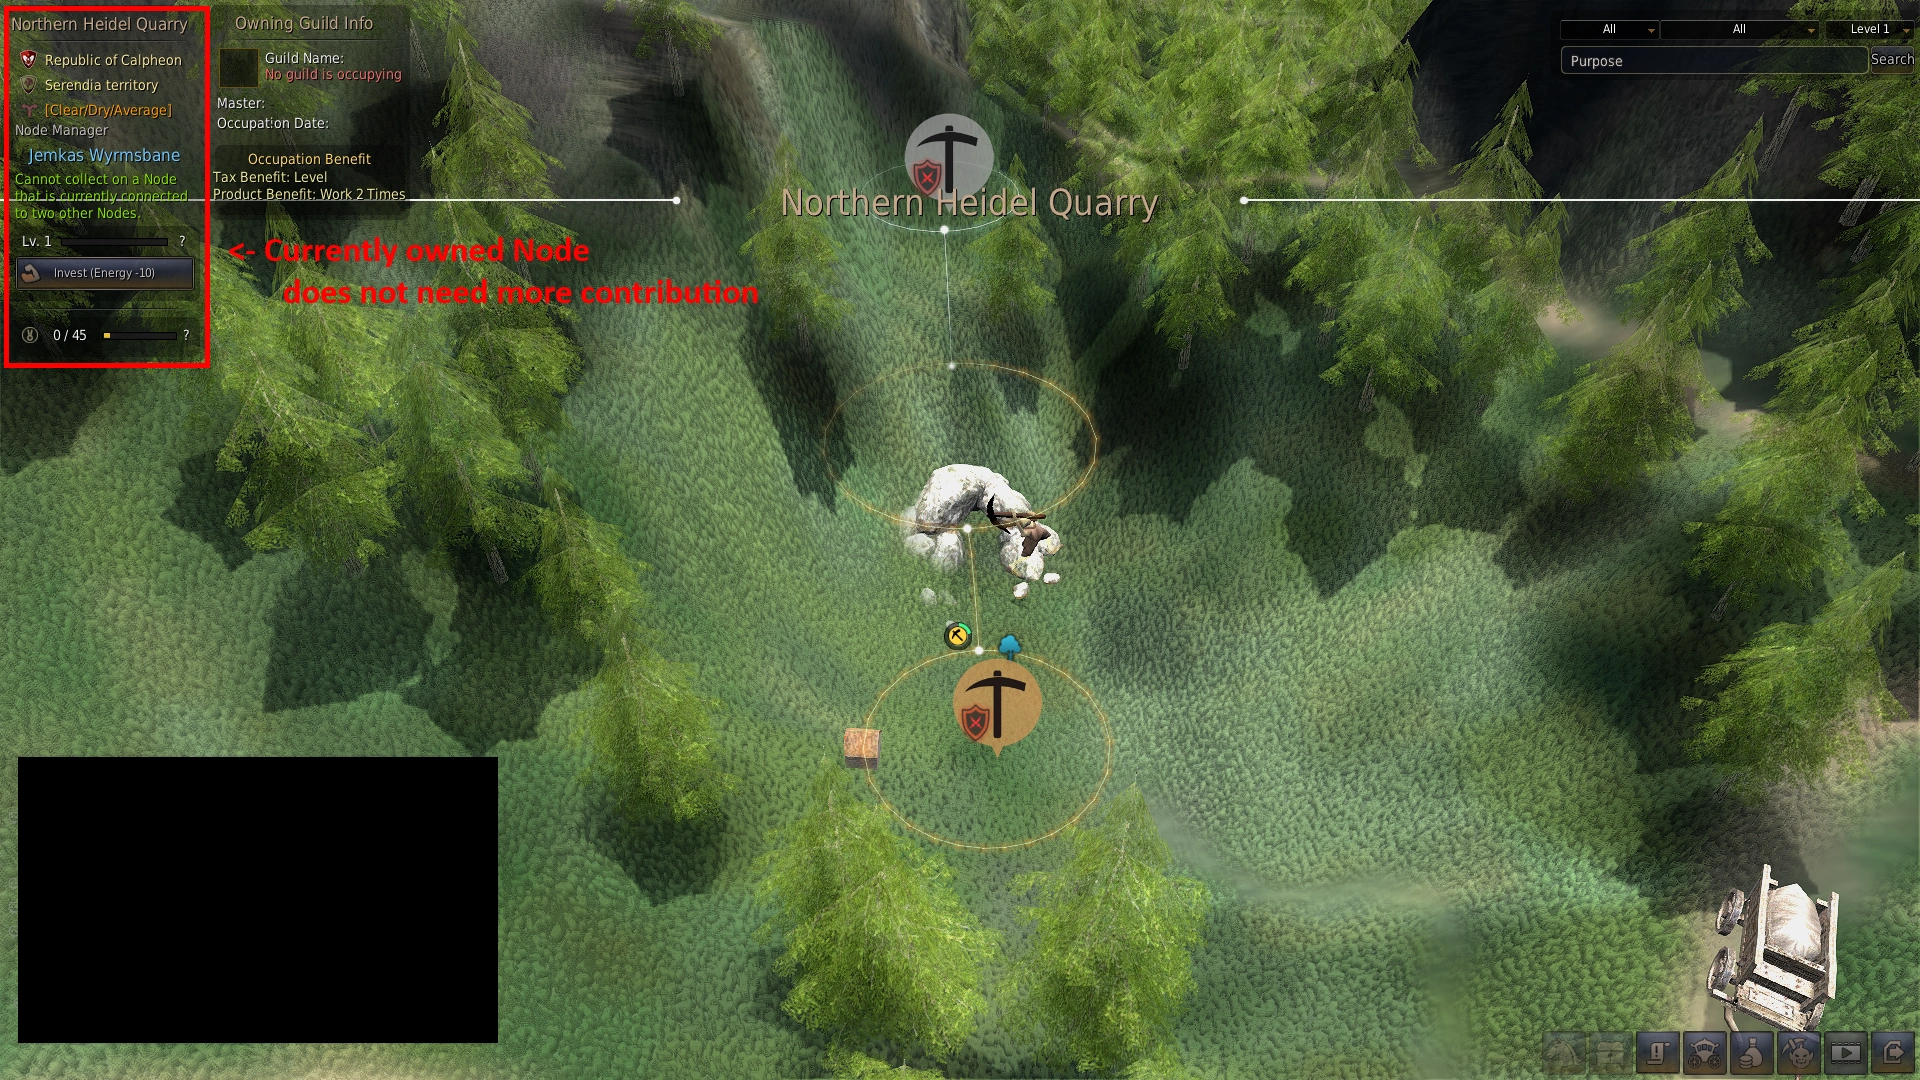
Owned (name) node.
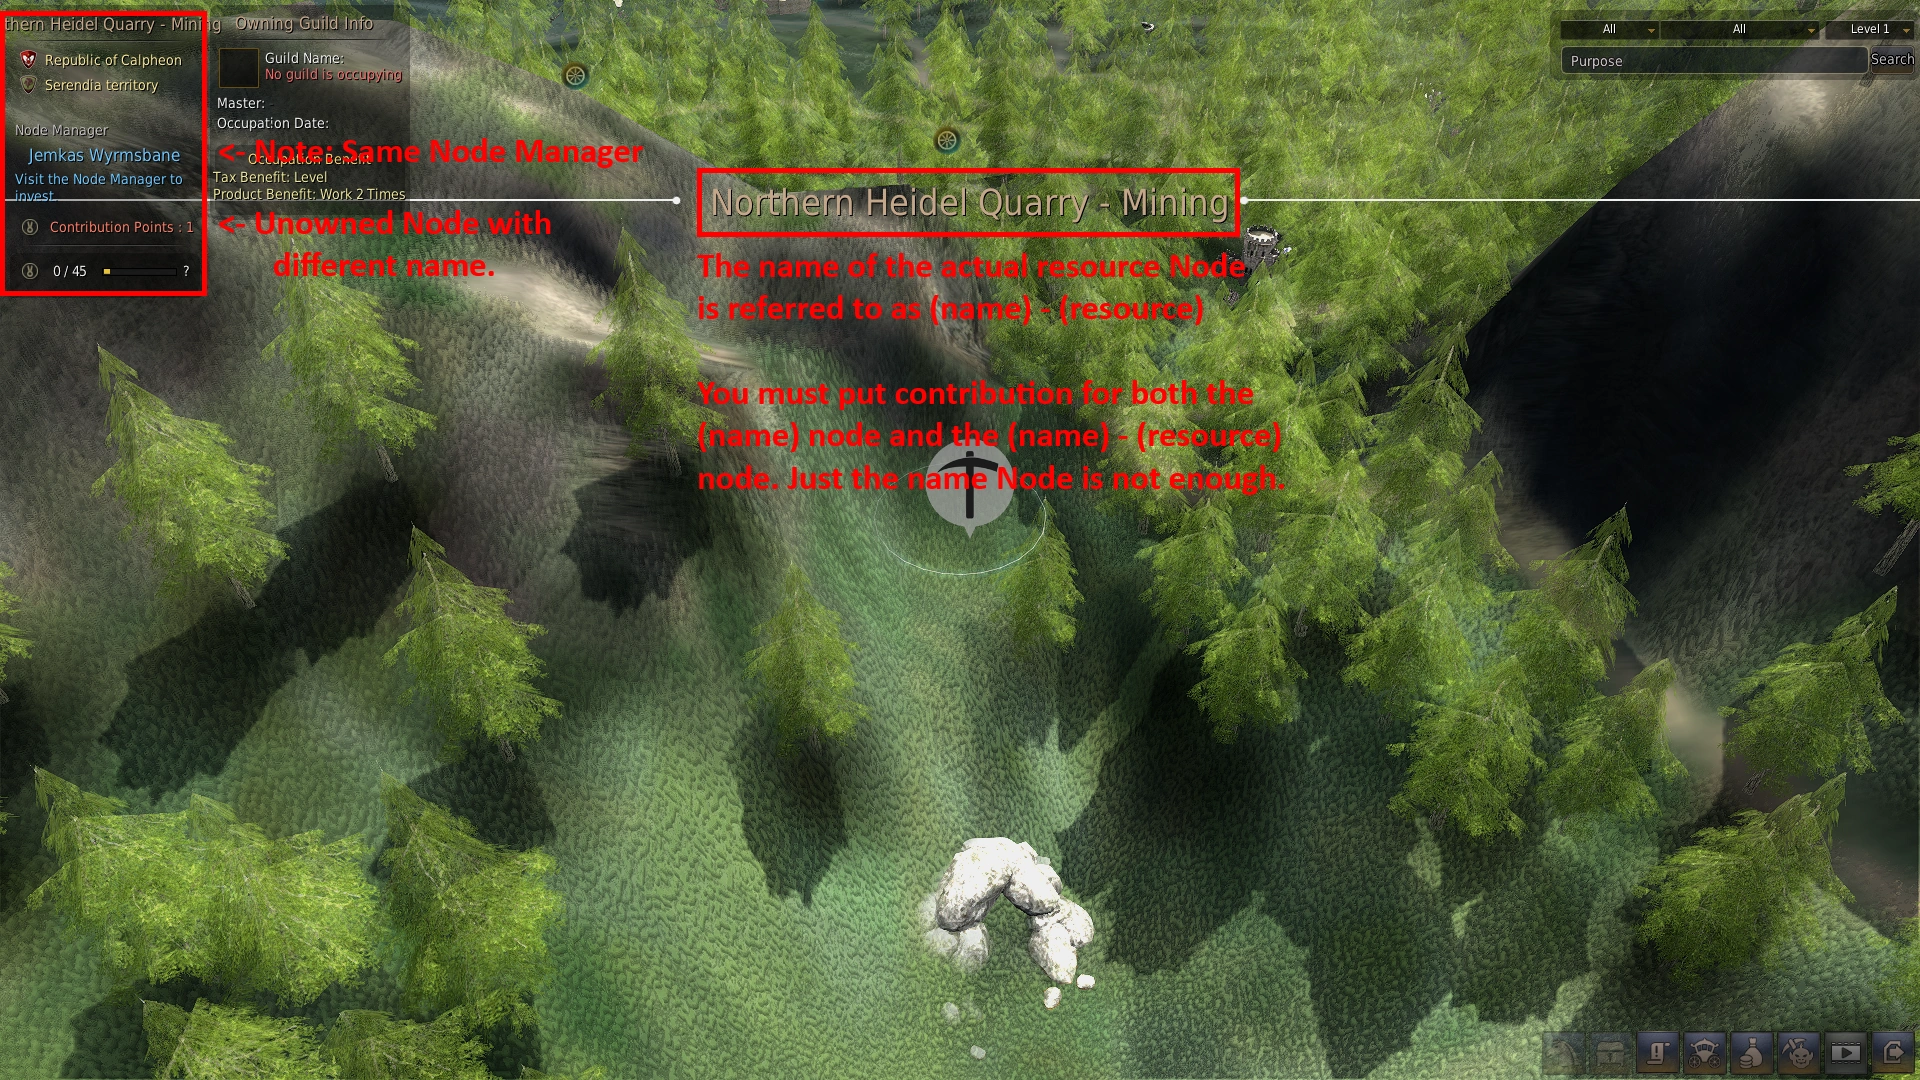
Unowned (name) - (resource) node that must also be owned to send workers to.
Production Nodes
To assign a worker to gather a resource and bring it back to the regions storage you need to unlock all connecting nodes between the work location and the worker's city of origin by spending contribution points. You must also have spent contribution points on both the final location node and the resource node belonging to it (shown in the images below).
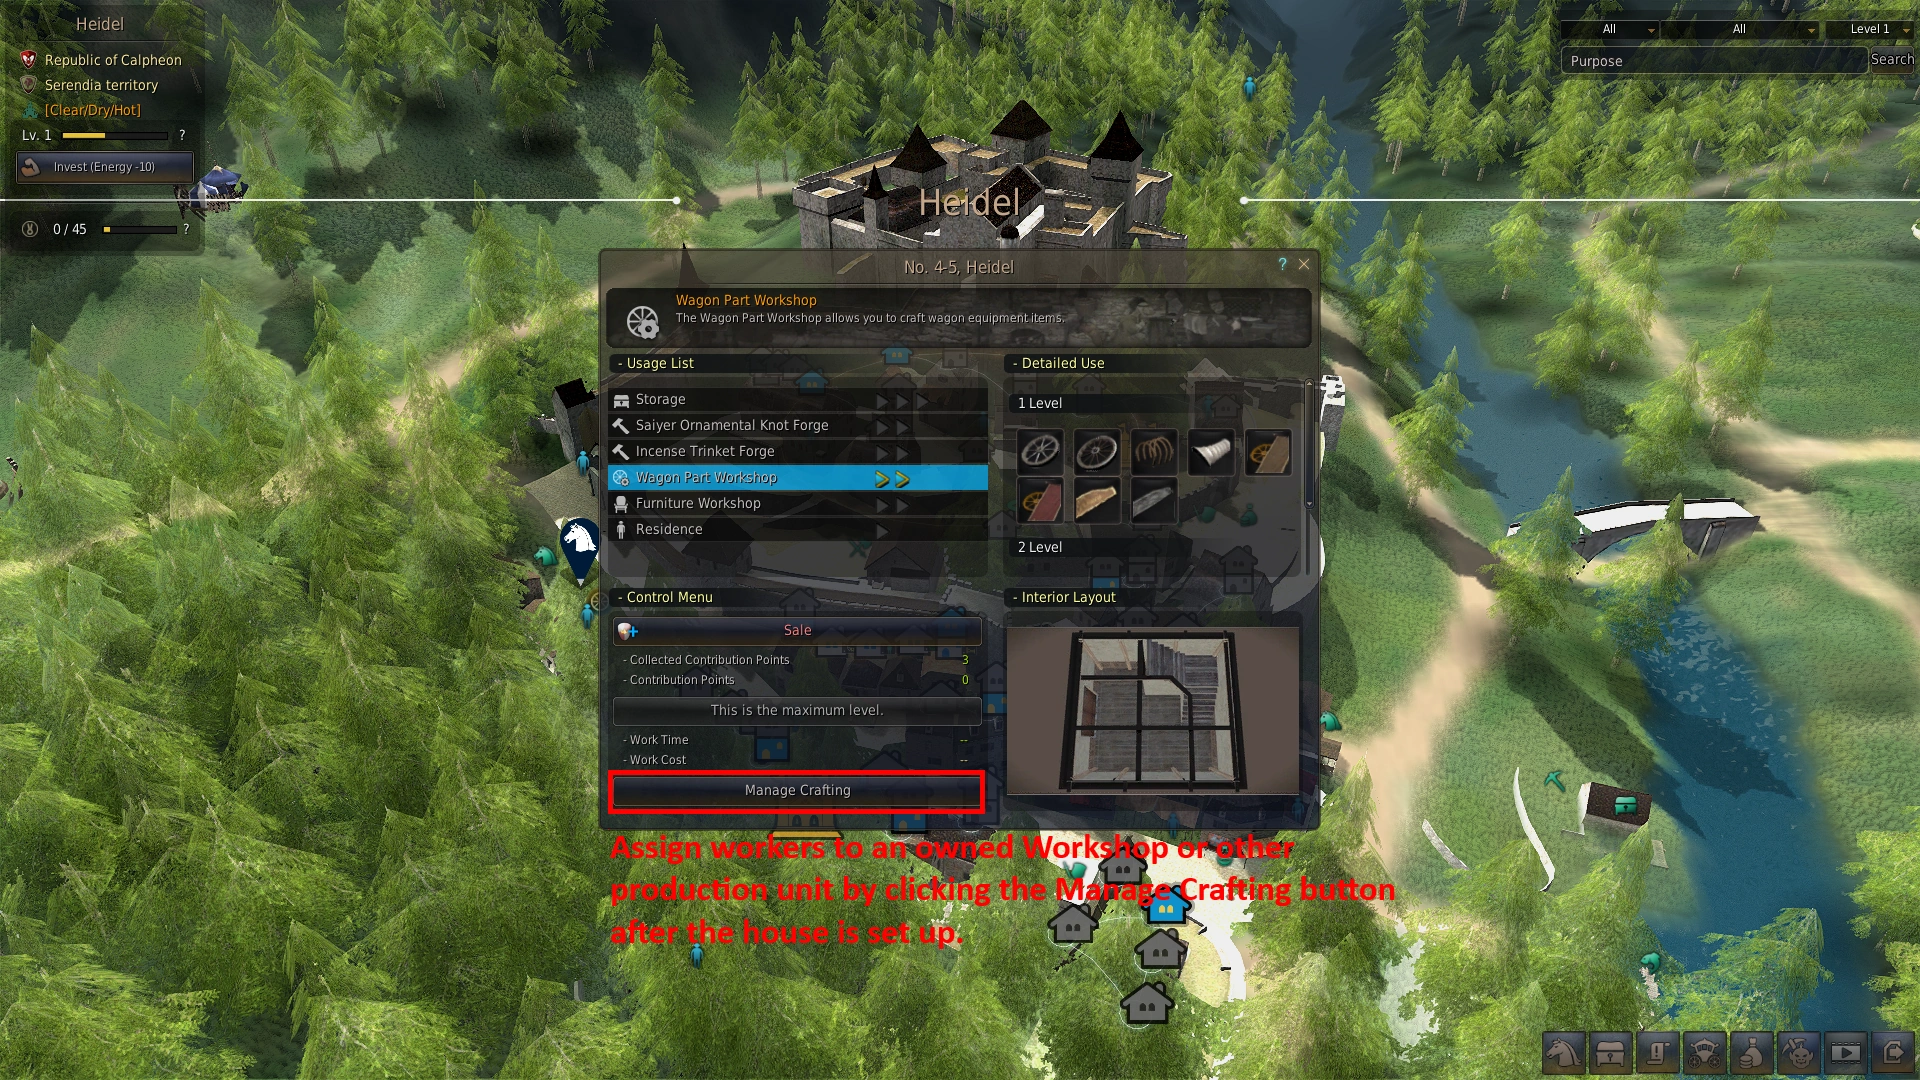
How to assign workers to an already owned production house.
Crafting
If you assign workers to a workshop they will take resources from storage, process them and put the resulting good back into storage - provided there are empty slots. Worker can craft a wide array of items but which item depends on the type of workshop you assign them to. Once again all nodes between the lodging of a worker and the workshop have to be connected and they will only access the regional storage. So having good A in storage at region X will not be accessible if the worker lives in region Y.
Investment Banks
The third method is to earn money by sending your workers to investment banks. You don’t need contribution points to unlock Investment Banks, but you will need Gold Bars to invest. You can obtain gold by going to the Storage NPC and converting your silver into gold bars of various silver values.
Garden
The fourth method is to send workers to manage crops in your garden. Gardens without workers will require periodic care and will have a typically slow growth rate. Assigning workers to a garden will allow them to automatically prune and take care of pests automatically thereby reducing the time it takes to harvest.
PvP
The fifth way to use your workers is to assign them to build a command post or castle for the Conquest war or Node war. You may need to mobilize a large number of workers belonging to the guild because the command posts and castles will need to be ready for these massive PvP events.
Stamina
Worker consume Stamina from a limited pool they have. When a worker runs out of Stamina, you need to use a certain type of food item to restore their Stamina points.[2]
Worker List
The worker management is located at the bottom right of the world map, or through the mining pick button located beneath your experience bars. Via the worker management, you can check their job progress, restore their Stamina, send them through an upgrade test, cancel their remaining work order, or fire them.
Promotion
Upgrade tests are available to a worker once every 10 levels, with the chance to go up in quality by one level. They take 24 hours to complete, and you can only have one worker in a test at a time. Promotion tests continue to progress even while logged out. The results of a promotion test will be sent to your in game mail.
Skills
As your hustle and bustle they will accumulate experience points. Every 5 levels they will acquire a random skill. once worker becomes level 30 they would have acquired 7 skills. The skills granted to workers is random, but there are certain skills that are only available to higher skill level of workers.
When you promote your workers, their skill level will increase, but their experience and skills will be reset. It is still recommended to promote workers as they will have higher base stats. Workers purchased through the amity game will already come with certain preset skills. Make sure you research carefully to get the workers that best benefit your play-style.
Skill Reset
Once a worker reached level 30, has 50% xp, is either artisan or has failed all promotions, you can perform a skill reset. This will allow you to build the perfect worker based on your needs. The skills acquired through the skill reset is random but can be done continually as your worker earns XP.[3]
Workers Exchange
You can use a Work Supervisor NPC to buy and sell workers to other players, allowing you to directly profit from a developed worker. Multiple factors affect the price of the worker, such as quality (color), abilities, and level. Using the market, you may discover a worker tailored to a specific task you perform.